Just wanted to share a little before and after from our show last weekend.....


 And I can honestly say I hope I never run into another one....
 Here she is all done up for the dance...


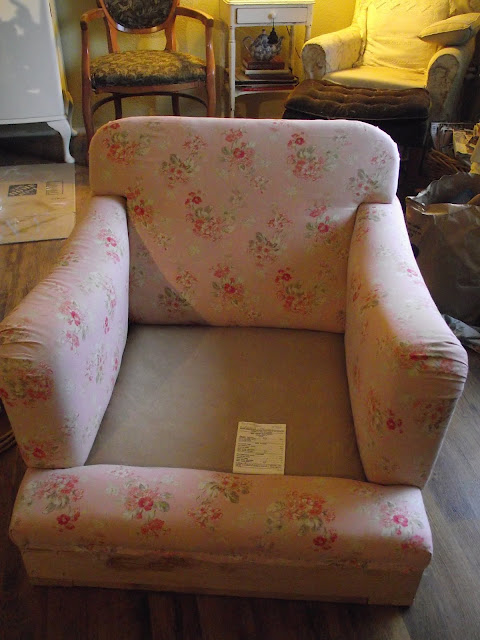
Will you recognize it?

Clearly I didn't purchase this on appearances....
it was in good shape and a steal of a deal, I couldn't pass it up!


I hardly recognize it myself and I was the one to strip it down and recover it. I used a beautiful cottage floral in rose tones. with looped fringe between the top and skirt. I love this transformation. It truley went from ugly duckling to swan. Hope you enjoy.
A little Before and After........

When I found this sad side chair it didn't have any legs....but it had great lines....

My Mr Nest, taking this chair apart....

Who would've guessed it was a modular chair and came apart in pieces....
Never in all my years of reupholstery have I ever run into a modular piece of furniture....


I enjoy adding little dress makers details to chairs for extra charm.....


Hope you enjoyed my little upholstery project...
It sold rather quickly and I'm pretty sure it was love at first sight for the lucky gal that got it...

Will you recognize it?

Clearly I didn't purchase this on appearances....
it was in good shape and a steal of a deal, I couldn't pass it up!

and here's a closer look....

I hardly recognize it myself and I was the one to strip it down and recover it. I used a beautiful cottage floral in rose tones. with looped fringe between the top and skirt. I love this transformation. It truley went from ugly duckling to swan. Hope you enjoy.
A little Before and After........

This is definitely the before...... I scored these at the local thrift store in my neighborhood. I bought them for a song. It is a good day with bargains like that.

a lot of Sanding, a lot of primer (grey because that is what I had on hand), removal of old sticky hardware, more sanding..... And notice the trim from our remodle in the back ground....

and even more sanding....
then a coat of grey blue paint.

This is a left over sample from our remodeling. I am giving you valuable info here friends.... use these samples. I got both night stands done with only half of this container.

...I then painted a antique white over the blue...a little more sanding, glazing and then I got to add the jewelry for any furniture....

these are acrylic, not glass, but who cares! they are gorgeous and they have a slight tint of blue. And best of all they were free! Victoria had them left over from another project.....
(it's good to have Friends that collect and hold on to as much "junk" as I do)
(it's good to have Friends that collect and hold on to as much "junk" as I do)

Finally it's done, and I get to do it all over again for it's twin.
here are some of the products I used....

Glaze, Antiqueing medium, and clear coat spray in satin.....
Can you see the rain from the window? Yes, I live in the Northwest and it's usually raining so I painted these night stands in my front room. I happen to have an enormous front room that is separate from our family room. So often times it becomes my work shop. Actually it's used more as a work shop than a living room.


These ruffled lamp shades are an original design by Ella. They are true cottage style. I have no Before pics, so sorry friends. They were a thrift store find. I had the shades for bed room lamps I was no longer using. they were green with beaded fringe. Perfectly lovey and I think my Hubby thought I had lost my mind when I ripped them apart. I left the lining inside to make them safer for the muslin shell I hand stretched and hand sewed in place. I then made my own double folded bias tape for the edges.
You can do this by cutting your fabric from corner to corner about 2 inches wide. then get your iron out and press it in half and the edges in towards center. so they are folded inside the bias tape.Let me tell you there is a reason why lamp shades are expensive! It takes alot of patience and alot of pins and alot of hands. (jk)
Once you have the fabric shell done then you add your ruffles row by row. Do Not Use Hot Glue. I have seen people do this and it never ends on a good note. Lamps are used and they get hot. Hand sewing is the only way to do this properly.
It's alot of work but worth it. They flew out of space on show day. I could have sold several sets of just shades. I have several more made for the next show. This is time consuming and Definitely not for the faint of heart (or a beginner). So be Brave!